Category: Linux

  • Cleanup Linux logs

    I just had the case that my disk on a Linux VM ran full and I had to make space quickly. I was willing to sacrifice my journald logs in order to make the urgent update work and I was able to free up a few gigabytes of space with the following commands.

    journalctl --rotate
    journalctl --vacuum-time=1s

    This drops all the logs and frees up space immediately.

  • Wait for host in BaSH

    Okay, this one is a little specific, but I recently had this issue and I wanted to share it because knowing this would have saved me one scripting language and a lot of time. I have previously implemented this in PowerShell, but it can easily be done in BaSH as well.

    The premise was to setup a new virtual machine and before I could work with the machine I had to wait until it was created and powered up. The installation was done in a pipeline and so there was no interaction. The following script waits until the machine is available and can be pinged and then terminates. This is not a finished solution but a small part of the pipeline that allowed me to continue with the regular installation via SSH after the machine was available.

  • Automate with ssh

    Scenario

    I have a bunch of Linux hosts to perform actions on. Updates, certificates, cleanup, you name it. I do all my work over “ssh” but for that to work the hosts must be trusted. Of course I can use “ssh-keyscan” to get the keys but my own “known_hosts” file gets pretty messed up when I add all the keys there. I would like to use a temporary solution. The best would be a parallel temporary solution so that I can handle a lot of hosts at once. Fortunately PowerShell allows such a thing. In this example the host has the name “4ab586fc-9a23-49eb-8d81-f2ca021203aa” (I really love GUIDs) and the full domain name would be “4ab586fc-9a23-49eb-8d81-f2ca021203aa.example.com”. Keeping this in mind the script that gets the key, performs the action (a simple “ls”) and deletes the key would look like this:

    Start-Job -ScriptBlock {
    	$Uuid = "4ab586fc-9a23-49eb-8d81-f2ca021203aa"
    	$Domain = "$Uuid.example.com"
    	ssh-keyscan "$Domain" >> "$Uuid.known_host"
    	ssh -o UserKnownHostsFile="$Uuid.known_host" root@"$Domain" "ls" >> "$Uuid.output"
    	Remove-Item -Path "$Uuid.known_host"
    }

    The catch here is, that the servers public key is temporary stored in a local file instead of the users “known_hosts” file and then referenced with the parameter “-o UserKnownHostsFile=$Uuid.known_host” in the ssh command. After completion the file is then removed and the access to the server was a success. Running this in a loop allows the execution of tasks on multiple servers at the same time.

  • Zabbix agent deployment and configuration

    Installation and configuration of the Zabbix agent, the counterpart of the Zabbix server, that collects and sends data to the server to be shown, is quite easy and can be done with a simple bash script.

    #!/bin/bash
    # File: client.sh
    
    SERVER=$1
    HOSTNAME=$2
    
    # Zabbix version
    ZV=5.4
    
    # File name version
    FNV=${ZV}-1
    
    if [ -z $HOSTNAME ]
    then
            HOSTNAME=$(cat /etc/hostname)
    fi
    
    if [ -z $SERVER ]
    then
            SERVER=zabbix.example.com
    fi
    
    wget https://repo.zabbix.com/zabbix/${ZV}/ubuntu/pool/main/z/zabbix-release/zabbix-release_${FNV}+ubuntu20.04_all.deb
    dpkg -i zabbix-release_${FNV}+ubuntu20.04_all.deb
    apt update
    apt install -y zabbix-agent
    
    sed -i "s/^Server=127\.0\.0\.1$/Server=${SERVER}/g" /etc/zabbix/zabbix_agentd.conf
    sed -i "s/^Hostname=Zabbix server$/Hostname=${HOSTNAME}/g" /etc/zabbix/zabbix_agentd.conf
    
    systemctl restart zabbix-agent.service

    Now let’s imagine you have 1000 hosts and would have to do that on each and every one of them. That’s going to be a long day of work.

    My assumption here is, that you as the administrator have ssh root access to all these machines via a ssh public key and each host has a individual hostname (For example: vm1, vm2, vm3, …, vmN or GUIDs).

    If this is given the shown script can be transferred to the host via “scp” and executed via “ssh”. I will show this with 4 hosts but with a little bash magic this can be extended to a lot more.

    #!/bin/bash
    # File: server.sh
    
    SERVER=zabbix.example.com
    
    for HOST in vm1 vm2 vm3 vm4
    do
            scp client.sh root@$host:/root/client.sh
            ssh root@$host "chmod u+x ./client.sh; ./client.sh $SERVER $HOST; rm ./client.sh;"
    done

    In this script the server securely copies the file “client.sh” shown above to the hosts one by one and executes it to install and configure Zabbix agent. The agent is restarted afterwards and can be added to the Zabbix server. I am planing to write another tutorial on how to do this via API. This can then be integrated into the server script.

    The client script can also be used to add the Zabbix agent manually. Just check the current version and modify the script if necessary.

    As always: I hope this saves somebody some time and makes administration a little bit easier.

  • Parse JSON output from an API with Python

    As great as PowerShell is with JSON objects you can’t always use it because it is not available on each and every machine with Linux out there. And I don’t know a way of parsing JSON code with plain bash properly. Fortunately a lot of servers come with “python” installed and it can be used to parse JSON and retrieve values from the object with a comprehensible notation.

    For example, this is the response from a API call to create a new DNS record in a self managed zone:

    {
        "record": {
            "id": "4711",
            "type": "A",
            "name": "testentry",
            "value": "0.0.0.0",
            "ttl": 3600,
            "zone_id": "2",
            "created": "1970-01-01 00:00:00.00 +0000 UTC",
            "modified": "1970-01-01 00:00:00.00 +0000 UTC"
        }
    }

    What I would need from this call is the record id. To show how this works, I have to explain and extend the example: Such a response comes most of the times when calling an API via “curl” for example. It is not just lying around on the disk. This in mind let’s assume that the shown JSON code is the result of the following call:

    curl -s https://exampleapi.goa.systems/path/to/endpoint

    Now curl just puts out the response on stdout and we can pipe it in the following command and read it there via stdin:

    curl -s https://exampleapi.goa.systems/path/to/endpoint | python3 -c "import sys,json; print(json.load(sys.stdin)['record']['id'])"

    With this code the value of “id” (['record']['id'] – compare with the source JSON, in the example “4711”) is printed (println) on the command line. Now, to store it in a variable one could do this:

    $RECORDID=$(curl -s https://exampleapi.goa.systems/path/to/endpoint | python3 -c "import sys,json; print(json.load(sys.stdin)['record']['id'])")

    And then save it on the disk and use it for your purposes. In my case for example I’d use it for deleting the record later in a process I’ll describe in another tutorial.
  • Run Linux services only as local user

    Some time ago I wanted to let services like Apache, application servers, databases and stuff run as “Active Directory” users under Linux. Linux uses a component called “winbind”, which is part of the all famous “Samba” package, to connect to an “Active Directory”. What it does is basically map your AD (short for “Active Directory”) users to local users. One can log in, have a home directory, permissions, the users can become root by using the command “sudo” and so on. So why not use it for services?

    Well, as mentioned “winbind” maps the users and to let a service run under a specific user the user has to be accessible (or better: the user must exist). AD users do not exist as long as “winbind” is not loaded and when a service tries to start as long as “winbind” is not loaded it will terminate in an error. This is also relevant when using AD users for virtual hosts in Apache. There is a way to let certain virtual hosts run as a specific user instead of “www-data”. Same goes for cron: When the cron service starts and should run a certain command at a certain time in space as AD user but “winbind” is not loaded it will throw an error even tough winbind would be running when the command is scheduled to be executed. If “cron” does not know the user when parsing the file “crontab” it will not execute the command. These are a few findings why it is a bad idea launching services as AD users.

    My solution approach was to find something in “SystemD” like “winbind.target” and define my required services to only run if “winbind” is already loaded, but unfortunately there is no such thing. If anyone has an idea how to solve this feel free to contact me. Would be much appreciated.

    The solution I came up for me now is to execute “SystemD” services as local service user that can not log in. If the service creates data it is stored in the local service users home directory. To manage and access this production data “winbind” can be utilized: Share the service users home directory via a directive in “smb.conf”:

    [svcshare]
        comment = Service user directory
        browsable = yes
        writeable = yes
        path = /home/serviceuser
        valid users = @LinuxAdmins
        force user = serviceuser
        force group = serviceuser
        create mode = 0644
        directory mode = 0755

    This block allows members of the AD group “LinuxAdmins” to access the local service users home directory and upload and modify data. But data uploaded by this users is assigned “serviceuser” as username and group. This means the service an run even tough AD may not be accessible (server changed network, network error, etc.).

    I have now several services running stable with this solution and it works like a charm for me.

  • Change date modified of files and delete files other than n days

    I am working on a backup script on Linux and for that I need test data: Files that are modified on certain dates and that I can scan for. Of course I could create a file every day for the next month, but that would take a little too long. I found out, that one can use the command “touch” to change the dates for “modified” and “last access”

    touch -m -t 202107200100.00 test.txt

    This would change the modified date of the file “test.txt” to the 20th of July 20201 01:00:00 at night. This could be integrated in a loop for example. To create 10 files with one modified each day the following script does the job:

    #!/bin/bash
    i=20
    while [ $i -ge 10 ]
    do
      touch test_$i.txt
      echo "Hello World" > test_$i.txt
      touch -m -t 202107${i}0100.00 test_$i.txt
      ((i--))
    done

    Of course, this is pretty simple, but it does the job for my task.

    To scan and delete files older than 5 days I can then use …

    find . -mtime +5 -delete

    … in the same folder.

    Pretty neat, huh?

  • Creating network bridges without “bridge-utils”

    The following network definition cost me some time. I read in an article that the package “bridge-utils” is deprecated and is not required anymore to create network bridges under Debian and it’s derivatives.

    Let’s start with the code because that’s what I would be interested in, if I was looking for a solution.

    Code

    Just replace the addresses marked with “<…>”, store the file in “/etc/network/interfaces” and you’re good to go.

    source /etc/network/interfaces.d/*
    
    auto lo br0 eth0
    
    iface lo inet loopback
            up      ip link add br0 type bridge || true
            up      ip link add br1 type bridge || true
    
    iface br0 inet static
            address <static ipv4 address>
            netmask 255.255.255.0
            gateway <ipv4 gateway address>
    
            up      ip link set br0 type bridge stp_state 1
            up      ip link set br0 type bridge forward_delay 200
    
    iface br0 inet6 static
            address <static ipv6 address>
            netmask 64
            gateway <ipv6 gateway address>
    
    iface eth0 inet manual
            pre-up          ip link set eth0 master br0
            post-down       ip link set eth0 nomaster
    
    iface eth0 inet6 manual

    Explanation

    Initialization of the loopback adapter is “misused” to initialize the bridge because the looback adapter is started first.

    Before “eth0” is started it is attached to the bridge.

    The bridge is configured when it is up. This is done in the lines “up ip link set …”

    Thus I have to say that I am not 100% sure if this configuration is correct. For example most tutorials say to configure “forward_delay” with a value of “2”. But this does not work and the command always tells me, that the value 2 is out of range. “200” was the lowest I could go without getting an error.

    Conclusion

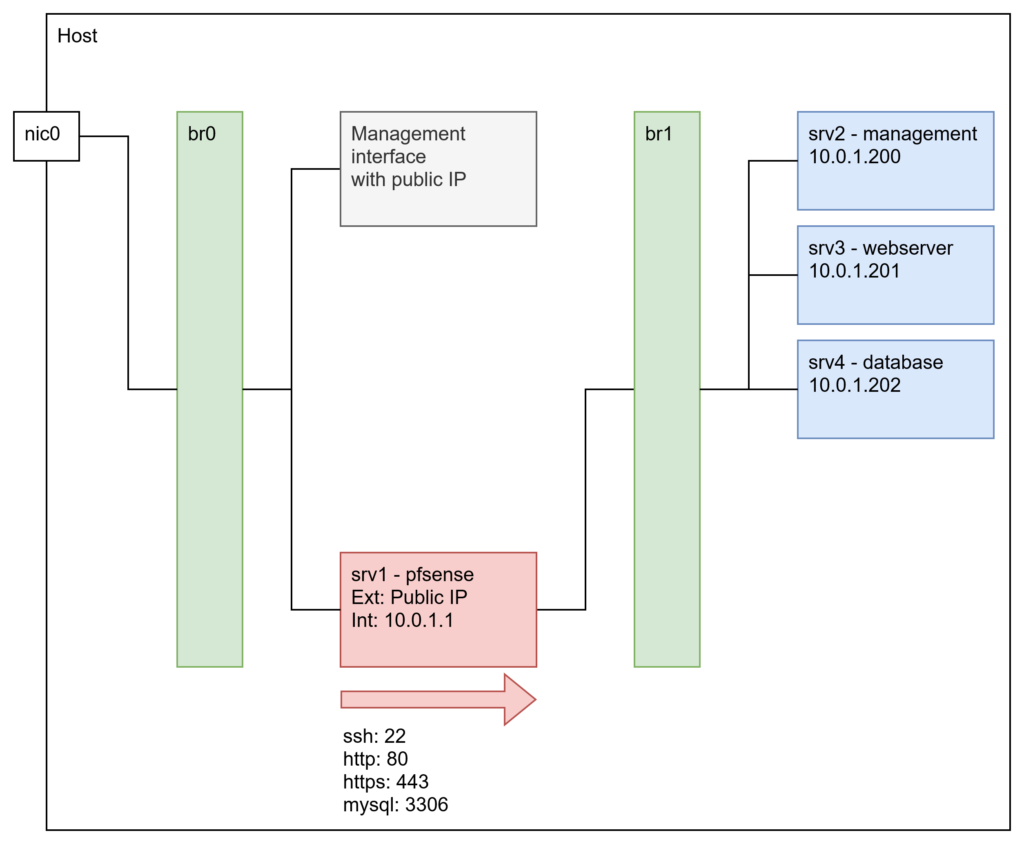
    Bridges are a great way to virtualize network traffic on a virtual machine. I have used it to set up three servers with multiple virtual machines and organize the traffic using a pfSense instance also running in a virtual machine. Basically something like:

    The firewall then NATs the required ports to the corresponding machines.