Category: Uncategorized

  • GitLab: Persisting data between jobs

    When I first tried to write and run pipelines in GitLab first thing I got were errors. I tried to create a json file containing data that needed to be accessible in each job of the pipeline. This was an id generated randomly in the first step and each following step would rely on this id to produce additional data and store it. I found out, that my generated id file was not accessible in the follow up steps and thus my pipeline would not work. Fortunately there is a solution for this and I’d like to share in a simple example of three files how to make this work. This can be adopted to all sorts of data like binary files, test results, compiler outputs, generated PDFs and all sorts pipeline output. This documented in detail on the official GitLab documentation page but because I prefer quick and direct tutorials handling just my core problem and leave modifications and extensions to me instead of blown up documentations covering every single detail I want to share my solution here.

    My solution consists of three files. The first two are the two scripts for the steps. Step one generates the JSON file and stores it and is called “step1.ps1”:

    $MyObject = @{
    	guid = (New-Guid).ToString()
    }
    $Json = ConvertTo-Json -InputObject $MyObject
    Set-Content -Path "guid.json" -Value $Json
    Write-Host -Object "Generated Guid: $($MyObject.guid)"

    The second file is called “step2.json” and reads the generated id from the JSON file and thus needs access to the file “guid.json”:

    $Json = ConvertFrom-Json -InputObject (Get-Content -Raw -Path "guid.json")
    Write-Host -Object "Loaded Guid is $($Json.guid)"

    Why is the generated UUID printed to stdout via “Write-Host”? To check if they are the same in the pipeline.

    Finally the “.gitlab-ci.yml” file defines the pipeline:

    stages:
      - create
      - read
    
    create-json:
      stage: create
      script:
        - pwsh -File step1.ps1
      artifacts:
        paths:
          - guid.json
    
    read-json:
      stage: read
      script:
        - pwsh -File step2.ps1

    So now your folder should consist of three files containing the shown code:

    And running the pipeline in GitLab will show this:

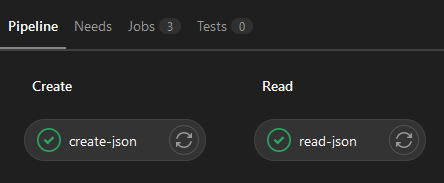
    The jobs can then be opened and should show …

    $ pwsh -File step1.ps1
    Generated Guid: deb4e6cc-c968-4c86-95f5-fd72ca0f64c9

    … in the “create-json” job and …

    $ pwsh -File step2.ps1
    Loaded Guid is deb4e6cc-c968-4c86-95f5-fd72ca0f64c9

    … in the “read-json” job in the log output.

    Now one has the basic principle implemented to share data and artifacts between jobs.

    But wait … there’s more!

    When opening the job the generated artifacts can be downloaded to the local disk:

    This zip file would now contain the file “guid.json” generated by “step1.ps1” and defined in the file “.gitlab-ci.yml” with the lines

    artifacts:
      paths:
        - guid.json

  • Installing Git on Windows

    I tried to sum up the installation options that I use and that make most sense to me. If course they are arguable and I can explain why I use them and why they make sense from my point of view.

    Git for Windows can be downloaded here. I have made the screenshots with the current version from mid of June 2021. The installation options change and I will try to keep this tutorial up to day. If there are new options not covered in this tutorial one has to do some research what the options mean and what is the best setting.

    Here the preferred editor can be selected. If the installed editors are unknown, just use “Notepad”. I use “Notepad++” and “Vim” (if installed).

    I always use “Checkout as-is, commit as-is” because I don’t like the line endings rewritten. I work between Linux and Windows and this can lead to some annoying problems, for example when writing files on Windows for Linux.

    After selecting “Install” the installation process will start and the setup can then be closed as soon as the this is done. Git tools can then be opened in windows folders by using right click for the context menu:

  • AllInOne DevOps solution

    “Learning” for me means “practicing”. That’s why I started initializing every single small project with a Git repository, setting up a simple build pipeline and exporting artifacts to a central repository and I do this for Java projects (Gradle, Maven) in the same manner as for .NET projects (dotnet, NuGet). One might ask now: Why not just build the project and copy the output? This method is usable when it is only one project worked on by one developer for example when someone wants to try out some stuff, wants to learn project specifics or it is just a small thing to code (well, even then it is better to setup the tools because if the project grows you have everything ready for a big team). But as soon as there are more developers working on a project it is necessary to use collaboration and automation tools. That’s why I practice setting up the build environments with every new project because then it is routine and not a burden to do.

    What is the goal of this article? Let me start with the non-goal: I don’t want to provide a “Click here, then there, then fill this field and click Install.” tutorial. I want to share my experience, provide links to the tools I use and what to do with them and show the outcome. Most of the knowledge needed for this is generic: Setting up a SQL server is not specific to the usage in Azure DevOps and neither is setting up Windows 10. There are a lot of tutorials out there and I don’t have to reinvent the wheel here. I want to show that setting up these tools in the shown order leads to a running DevOps server that can save a lot of time and improve code quality and team collaboration.

    So, what is this setup for? Copying output manually can, as mentioned, be done for one project, maybe two and maybe also up to 10. But then this becomes annoying, confusing and hard to manage. As soon as I work on many projects I just want to commit and push my stuff and the rest is done by the build environment. And that is what this setup is about. Let’s start with the preconditions and prerequisites. I really use a power machine for this task:

    • HP Compaq 8200 Elite (initially bought 2012)
    • Intel Core i5-2500 quad core CPU (Yes, “Sandy Bridge” generation)
    • 16 GB DDR3 memory
    • 500GB Crucial SATA-SSD

    So, as you can see, you really need top of the line, high performance hardware 😉 No not really. What I want to show here is, that a small, old office computer does the job for learning the stuff.

    On the software side I use the bundled operating system and some other tools and programs. Don’t worry, they are all free of charge:

    These are all the things you need. Really.

    What are the limitations? First of all: You can’t use these tools for big business work loads and environments because they have hardware and software limitations. It’s more than enough to learn, practice and implement small projects but as soon as the requirements rise these limitations prevent you from using the tools in a large environment. The good thing is that the learned skills can be applied directly to big environments because the tools are the same and are handled the same way.

    The setup is divided into a few steps to make it easier. I start with a blank machine: No OS, no software and an empty drive:

    1. Install Windows 10 Pro. You can get it from here. It should already be activated if it was installed beforehand on the computer and the computer is connected to the internet.
    2. Download and install SQL Server 2019 Express.
      It is required for Azure DevOps and can also be used for development databases. I recommend a local setup with “sa” user.
    3. Download and install the latest Azure DevOps setup. I recommend also a local installation with http only. Setting up a SSL PKI and configuring IIS would be to much and does not serve the purpose here.
    4. Download and install Oracle VirtualBox and the extension pack.
    5. Setup one or many build agents (Windows agents can be directly set up on the machine, Linux agents can run in VirtualBox instances). Builds are only running on agents, not the DevOps server itself.

    As soon as these five steps are done the build server can be used for different project types. Just to name a few:

    • Java projects
      • Can be build on Windows and Linux build agent.
      • Supports different frameworks (JavaEE, Spring, Vaadin, …)
      • Supports build systems like Gradle, Maven and Ant.
    • .NET core
      • Builds all kinds of projects as long as the tools are installed on the build agents.
      • Has native support for .NET core tasks.
      • Easy usage of private NuGet repository.
    • Plain tasks with scripts
      • Supports different script languages like PowerShell and Bash.
      • Deployment with ssh.
    • JavaScript
      • Supports common JavaScript frameworks.

    I don’t want to go too much into detail here because there are tons of tutorials on the internet and the setup itself is pretty much self explanatory and supports the user with assistants.

    The following diagram shows the architecture. The only difference to my setup is, that my Maven repository is externalized and is not running on the DevOps server. It is optional anyway and used for Java library distribution. So if one is not building Java projects it is not required.

  • Knowledge has to be where I am

    Where am I? In a project, in a code repository, deep down in the code or maybe on a bash shell on a remote Linux server. And I want the knowledge I need to work to be accessible from where I am. In this article I will show a few sources of knowledge that came in quite handy for me.

    Markdown

    I am in a code repository checking out a project that uses a build system I am not familiar with and a framework I have not yet worked with.

    Thank god the developer provides a README.md file in the repository: A well formatted document that highlights the commands I need to checkout and build the project. Direct links to frameworks and dependencies that I can download and install and after 10 minutes I have set up the project, created a branch and started coding.

    No waiting for colleagues, no interrupting others, no frustration. It just works.

    Manpages

    I am on a server, setting up a software I don’t know yet using tools I am not familiar with.

    Thank god Linux has manpages that describe the syntax, available parameters and general usage of the tools.

    But wait, there’s not only Linux one could say. True. PowerShell fortunately also has similar pages.

    And what if I am using a third party software? At this point the DevOps principle comes in handy: Just copy the software to the directory and start the application or go the extra mile, set up a private mirror, create packages, provide manual pages and use the deployment lifecycle to update the tools. Of course this is more effort but automated build tools can do a lot of the work automated and when the team grows this techniques are of inestimable value.

    Wiki

    I’m in a log file and the log gives me error codes.

    Thank god the company has a wiki where these codes are described. I just open it up, paste the code into the search field and the wiki takes me directly to the description and troubleshooting guide.

  • Enabling public key authentication

    Using public key authentication for services like ssh and scp is easy.

    • Generate your keys (on the client)
    • Deploy the public key to the server
    • Authenticate automatically

    The details are tricky.

    • WinSCP needs another format.
    • OpenSSH format is not recognized by all tools.
    • You have two keys, how do you specify which to use?

    There are a bunch of commands, parameters and tools to overcome this problems and I want to explain them in this post.

    After working through this tutorial it should not be a problem anymore to

    • Generate a key
    • Use it with services like GitHub, GitLab, Jenkins, Azure DevOps or others.
    • Connect to hosts without a password.

    Generate the keys

    Windows now also comes with the required tools and because of this I am going to show the commands without explaining how to get the tools on older versions of windows.

    The tool for the job is ssh-keygen. But wait, there are a few parameters that should be set to generate a well compatible key.

    ssh-keygen -b 4096 -t rsa -N "" -f id_rsa_test

    This command will generate the key pair into the “.ssh” folder inside the users home folder with the filenames set to “id_rsa_test” for the private key and “id_rsa_test.pub” for the public key. It will use the RSA algorithm with 4096 bits and will store the key without a passphrase.

    If the command is used with PowerShell, the “-N” command line parameter has to be changed:

    ssh-keygen -b 4096 -t rsa -N '""' -f id_rsa_test

    The files are named “id_rsa_test” to prevent possible overwriting of a existing key. If there is no key present, the “-f” parameter can be omitted. In this case the keys are generated in the folder the user is in at the moment. The default folder for ssh keys is the subfolder “.ssh” in the home directory:

    CMD: %UserProfile%\.ssh
    Powershell: $env:USERPROFILE\.ssh
    Bash: ~/.ssh

    Use the keys

    For public key authentication the content of the file “id_rsa_test.pub” is distributed to the services and hosts the authentication should work against. The content looks similar to this:

    ssh-rsa AAAAB3 ... A1TQ== user@hostname

    For example if used to authenticate a ssh user against a Linux machine this key is inserted into the file

    ~/.ssh/authorized_keys

    of the targeted user. A connection without a password can then be made with the following command.

    ssh target_user@target_host

    To use the key for GitHub authentication follow the next steps to add the public key:

    This will lead to a form where the public key can be pasted into. After saving remote repository actions can be done via ssh without entering a password.

    There are plenty of other systems using public key authentication. The process of generating a key and distributing the public key to the system is always the same.

    Convert different formats

    It is possible, that the “ssh-keygen” command generates a key in the form

    -----BEGIN OPENSSH PRIVATE KEY-----
    b3BlbnNzaC1rZXktdjEAAAAABG5vbmUAAAAEbm9uZQAAAAAAAAABAAABFwAAAAdzc2gtcn
    ...
    cDsAEG0AAknP6m2PmwAAAA9hZ29AU0VSVkVSLTAwMDcBAg==
    -----END OPENSSH PRIVATE KEY-----

    instead of

    -----BEGIN RSA PRIVATE KEY-----
    MIIEowIBAAKCAQEAw6mBu3IALusG9yM3mkhhkNle9XWDXSuPn9OD56A7/75jyvSt
    ...
    bEQNA6lH/Mwf99lci4E0U/8L+zuB51ANpTg3eVGYauHEt4UnzDKl
    -----END RSA PRIVATE KEY-----

    This key can be easily converted using the following command.

    ssh-keygen -m pem -f <path/to/keyfile>

    This replaces the OpenSSH formatted key with a RSA key.

    Generate a PuTTY Private Key File

    Tools like WinSCP and PuTTY require a specific key format. This can be generated using a tool called “PuTTYgen” which comes with the PuTTY installation package. Start the program and import your generated private key:

    When imported select “Save private key”:

    In this example no passphrase is specified. So you can confirm the next dialog with “Yes”.

    A file selection dialog will open and you can save the putty private key file. It is recommended to save it in the same folder as the existing private key.

    The key can be configured on a per host basis directly in PuTTY.

    In WinSCP it is similar to the configuration in PuTTY: Select the host, click on “Edit” and “Advanced” and in the new dialog select “SSH” – “Authentication”. Select you .ppk file.

    Specify key to use in ssh

    This is important when there are several keys for different hosts present on one system.

    ssh -i ~/path/to/private/key/file user@host

    With this command the key file to be used is specified.

  • Making applications available in non-login shells

    Assuming commands should be executed on a remote computer using ssh these commands have to be available in the PATH variable. This is not a problem with locally installed tools and commands on Linux systems but when custom programs should be executed this can get a little bit tricky.

    When you log in as a user the full profile is loaded. This means all defined PATH variables are set. But when a command is executed via ssh the profile is not loaded completely. The following command shows how this works:

    ssh user@host 'echo "Hello World"'
    Hello World

    This gets executed without a problem, but as soon as a third party application, like Java, is launched, something like this could appear:

    ssh user@host 'java --version'
    bash: java: Command not found.

    The problem here is, that the path to the Java executable is not in the global Path and thus the executable can not be found and executed. So how do you make it look like this?

    ssh user@host 'java --version'
    openjdk 11.0.10 2021-01-19 LTS
    OpenJDK Runtime Environment Zulu11.45+27-CA (build 11.0.10+9-LTS)
    OpenJDK 64-Bit Server VM Zulu11.45+27-CA (build 11.0.10+9-LTS, mixed mode)

    The trick is in the file

    /etc/bash.bashrc

    In this file you can find the bold line.

    export JAVA_HOME=/opt/java/stable
    export PATH=$JAVA_HOME/bin:$PATH
    
    # If not running interactively, don't do anything
    [ -z "$PS1" ] && return

    Everything that should also be loaded in non-interactive shells, like the one used with the ssh command, must be placed above this line.

    In this case JAVA_HOME is set to a custom Java installation (/opt/java/stable which is a symlink to a directory containing the application) and then this path is used in the global PATH variable.

  • Improve code quality in Eclipse

    Source code is volatile and when a team is working on the same code it can get let’s say “messy”. Especially when unused stuff is not removed and obsolete practices are applied. And to be honest, when the task of changing the logic is done I don’t start cleaning up my code. Fortunately there is support to take care of that during the coding process. Because I am working mainly with Eclipse I will show a few features of this particular IDE that keep the code clean. I will only show the Java formatter here, but it will give you a basic idea about the functionality and the practices can be applied to other languages as well.

    Why is it useful to define a company wide code style?

    Easier to read code

    When code has the same style it makes it easier for developers to read the code of others. A new developer does not have to worry to do something wrong because the whole code style and formatting is defined in the IDE during setup.

    Only the real changes are committed

    Imagine changing one line of code, saving the file and because you are using a formatter and the other developer doesn’t the whole file gets formatted. Thus all the formatting changes get committed.

    Commit changes

    Reduced Warnings

    Before …

    Formatter configuration dialog

    … and after saving:

    Formatter configuration dialog

    Unused imports are removed automatically. This makes code easier to read, reduces code size and is in general good practice.

    Formatter

    Formatters do exactly, what the name says: They format your code. The formatter gets started manually by pressing [Crtl]+[Shift]+[F] when a source file is opened. Then the indents, spaces and syntax gets cleaned up. Formatters are configured in the Eclipse preferences for several languages under the following path “<Language (i.e. Java)> – Code Style – Formatter”:

    Formatter configuration dialog

    Starting from this point some organizational tasks can be done:

    • Create and edit formatters
    • Import- and export formatter definitions (as xml files)
    • Open the configuration dialog

    I don’t go too much into detail here, but the code formatter is the place to define code conventions, guidelines and style. This can be done very detailed. And multiple profiles can be defined, ex- and imported.

    Formatter main window

    Temporary switch off formatter

    Let’s assume you have a source code like the following:

    String xml = ""
    + "<?xml version=\"1.0\" encoding=\"UTF-8\"?>\n"
    + "<note>\n"
    + " <to>You</to>\n"
    + " <from>Me</from>\n"
    + " <heading>Reminder</heading>\n"
    + " <body>About the task.</body>\n"
    + "</note>";

    Now the formatter would format it to this:

    String xml = "" + "<?xml version=\"1.0\" encoding=\"UTF-8\"?>\n" + "<note>\n" + " <to>You</to>\n"
    + " <from>Me</from>\n" + " <heading>Reminder</heading>\n" + " <body>About the task.</body>\n"
    + "</note>";

    But this is not readable anymore. To avoid this the formatter offers a special comment to temporary disable it:

    //@formatter:off
    String xml = ""
    + "<?xml version=\"1.0\" encoding=\"UTF-8\"?>\n"
    + "<note>\n"
    + " <to>You</to>\n"
    + " <from>Me</from>\n"
    + " <heading>Reminder</heading>\n"
    + " <body>About the task.</body>\n"
    + "</note>";
    //@formatter:on

    Now, even when formatting is applied, the marked code parts are left as they are.

    Save actions

    Formatters are great, but they have to be applied every time manually by selecting the appropriate menu item. Fortunately there are “Save actions”. These actions can apply formatters automatically when saving a file.

    Save actions dialog

    SonarLint

    Sonarlint analyzes the source code during coding, shows categorized hints and provides improvements. The tool is available as plugin for Eclipse.

    SonarLint provides improvement dialogs when code is not best practice.

    Improvement hint dialog

    When the description is opened text explaining the problem and offering improvements is shown.

    Improvement screen

    Conclusion

    I am working for some time now with these improvements and they made my code better and taught me better programming. If ones goal is to get better in coding and write code that is more stable and secure these tools can provide good support.

    Source: https://github.com/andreasgottardi/concepts/tree/master/codequality