Month: May 2021

  • Creating network bridges without “bridge-utils”

    The following network definition cost me some time. I read in an article that the package “bridge-utils” is deprecated and is not required anymore to create network bridges under Debian and it’s derivatives.

    Let’s start with the code because that’s what I would be interested in, if I was looking for a solution.

    Code

    Just replace the addresses marked with “<…>”, store the file in “/etc/network/interfaces” and you’re good to go.

    source /etc/network/interfaces.d/*
    
    auto lo br0 eth0
    
    iface lo inet loopback
            up      ip link add br0 type bridge || true
            up      ip link add br1 type bridge || true
    
    iface br0 inet static
            address <static ipv4 address>
            netmask 255.255.255.0
            gateway <ipv4 gateway address>
    
            up      ip link set br0 type bridge stp_state 1
            up      ip link set br0 type bridge forward_delay 200
    
    iface br0 inet6 static
            address <static ipv6 address>
            netmask 64
            gateway <ipv6 gateway address>
    
    iface eth0 inet manual
            pre-up          ip link set eth0 master br0
            post-down       ip link set eth0 nomaster
    
    iface eth0 inet6 manual

    Explanation

    Initialization of the loopback adapter is “misused” to initialize the bridge because the looback adapter is started first.

    Before “eth0” is started it is attached to the bridge.

    The bridge is configured when it is up. This is done in the lines “up ip link set …”

    Thus I have to say that I am not 100% sure if this configuration is correct. For example most tutorials say to configure “forward_delay” with a value of “2”. But this does not work and the command always tells me, that the value 2 is out of range. “200” was the lowest I could go without getting an error.

    Conclusion

    Bridges are a great way to virtualize network traffic on a virtual machine. I have used it to set up three servers with multiple virtual machines and organize the traffic using a pfSense instance also running in a virtual machine. Basically something like:

    The firewall then NATs the required ports to the corresponding machines.

  • Generating a less problematic public/private key file

    To use this tutorial OpenSSH has to be installed on Windows. This can be easily done with the following command. To execute it, PowerShell has to be started as administrator:

    Get-WindowsCapability -Online | ? Name -like 'OpenSSH.Client*' | ForEach-Object { if($_.State -EQ "NotPresent"){ Add-WindowsCapability -Online -Name $_.Name } }

    I had problems with key files in the OpenSSH format:

    -----BEGIN OPENSSH PRIVATE KEY-----
    b3BlbnNzaC1rZXktdjEAAAAABG5vbmUAAAAEbm9uZQAAAAAAAAABAAACFwAAAAdzc2gtcn
    ... ... ...
    aknUIaQ4oLEAAAATYWdvQERFU0tUT1AtM1VFRkMwNw==
    -----END OPENSSH PRIVATE KEY-----
    

    These files are created when using the plain “ssh-keygen” command:

    ssh-keygen

    I was, for example, not able to connect Netbeans to a remote git repository. It would just show me a password input and would not connect.

    It worked only when creating my key with the following command:

    ssh-keygen -m pem

    Which created a key that looked like this:

    -----BEGIN RSA PRIVATE KEY-----
    MIIG5AIBAAKCAYEA0jMI2eXJTx05Df7SxhYQUXNaDkmIZw8BQWtuM7QpGT3fL8gS
    ... ... ...
    H+D6fxp+aV+iqFmcDkB69+21r8WX246gHPHpHa4xYF1Z7UwzMhF+Zg==
    -----END RSA PRIVATE KEY-----

    When pasting the public counterpart, stored in “id_rsa.pub” into the authorized_keys file on the server, the connection could be established.

  • Create a simple .NET core library

    In my last post I summed up my Azure DevOps setup at home. When the machine is running, the application is set up and the services are started the first tasks can be added. In this post I want to show how to create a simple solution that offers the following functionality.

    • A simple library written in C# with basic functionality that can be extended easily.
    • NUnit tests to implement test functionality. This helps improving code quality and prevents the library from getting published with errors.
    • A file with Azure DevOps definitions called “azure-pipelines.yml”. This defines what the Azure DevOps server should do.
    • A “NuGet.config” file to specify the feed the generated artifact (the .nupkg file) gets pushed to.

    This can be seen as boilerplate. As soon as the library project is set up, the builds run through and the tests are executed everything else is copy, paste and good old programming. This means: The pipeline and deployment setup is implemented with a very simple projects which reduces the possible sources of errors and it can easily be tested. As soon as this is done the real development can start with little to no errors on the DevOps side. The following script just needs .NET core installed or at least the “dotnet” executable in the PATH. It creates the the solution including a library- and a test project. Additionally a example NuGet.config and a azure-pipeline.yml definition are created.

    @echo off
    
    set SolutionName=Example.Solution
    set LibraryName=Example.Library
    set TestsName=Example.Tests
    set DevOpsUrl=https://devops.example.com
    set DevOpsSpace=MySpace
    set DevOpsProj=MyProj
    set NuGetBaseUrl=%DevOpsUrl%/%DevOpsSpace%/%DevOpsProj%
    set RepoAlias=MyRepo
    
    dotnet new sln -o %SolutionName%
    dotnet new classlib -o %SolutionName%\%LibraryName%
    dotnet new nunit -o %SolutionName%\%TestsName%
    
    dotnet sln %SolutionName%\%SolutionName%.sln^
    	add %SolutionName%\%LibraryName%\%LibraryName%.csproj
    	
    dotnet sln %SolutionName%\%SolutionName%.sln^
    	add %SolutionName%\%TestsName%\%TestsName%.csproj
    
    dotnet add %SolutionName%\%TestsName%\%TestsName%.csproj^
    	reference %SolutionName%\%LibraryName%
    
    set CLASSFILE1=%SolutionName%\%LibraryName%\Class1.cs
    
    echo using System;>%CLASSFILE1%
    echo namespace Example.Library>>%CLASSFILE1%
    echo {>>%CLASSFILE1%
    echo     public class Class1>>%CLASSFILE1%
    echo     {>>%CLASSFILE1%
    echo         public static int GetValue() { return 4711; }>>%CLASSFILE1%
    echo     }>>%CLASSFILE1%
    echo }>>%CLASSFILE1%
    
    set UNITTEST1=%SolutionName%\%TestsName%\UnitTest1.cs
    
    echo using NUnit.Framework;>%UNITTEST1%
    echo using Example.Library;>>%UNITTEST1%
    echo namespace Example.Tests>>%UNITTEST1%
    echo {>>%UNITTEST1%
    echo     public class UnitTest1>>%UNITTEST1%
    echo     {>>%UNITTEST1%
    echo         [SetUp]>>%UNITTEST1%
    echo         public void Setup()>>%UNITTEST1%
    echo         {>>%UNITTEST1%
    echo         }>>%UNITTEST1%
    echo         [Test]>>%UNITTEST1%
    echo         public void Test1()>>%UNITTEST1%
    echo         {>>%UNITTEST1%
    echo             Assert.AreEqual(4711, Class1.GetValue());>>%UNITTEST1%
    echo         }>>%UNITTEST1%
    echo     }>>%UNITTEST1%
    echo }>>%UNITTEST1%
    
    set NUGETCONFIG=%SolutionName%\NuGet.config
    
    echo ^<?xml version="1.0" encoding="utf-8"?^>>%NUGETCONFIG%
    echo ^<configuration^>>>%NUGETCONFIG%
    echo   ^<packageSources^>>>%NUGETCONFIG%
    echo     ^<clear /^>>>%NUGETCONFIG%
    echo     ^<add key="%RepoAlias%" value="%NuGetBaseUrl%/_packaging/%RepoAlias%/nuget/v3/index.json" /^>>>%NUGETCONFIG%
    echo   ^</packageSources^>>>%NUGETCONFIG%
    echo ^</configuration^>>>%NUGETCONFIG%
    
    set AZUREPIPELINE=%SolutionName%\azure-pipelines.yml
    
    echo trigger:>%AZUREPIPELINE%
    echo - master>>%AZUREPIPELINE%
    echo.>>%AZUREPIPELINE%
    echo variables:>>%AZUREPIPELINE%
    echo   Major: '1'>>%AZUREPIPELINE%
    echo   Minor: '0'>>%AZUREPIPELINE%
    echo   Patch: '0'>>%AZUREPIPELINE%
    echo   BuildConfiguration: 'Release'>>%AZUREPIPELINE%
    echo.>>%AZUREPIPELINE%
    echo pool:>>%AZUREPIPELINE%
    echo   name: 'Default'>>%AZUREPIPELINE%
    echo.>>%AZUREPIPELINE%
    echo steps:>>%AZUREPIPELINE%
    echo.>>%AZUREPIPELINE%
    echo - script: dotnet build>>%AZUREPIPELINE%
    echo   displayName: 'Build library'>>%AZUREPIPELINE%
    echo.>>%AZUREPIPELINE%
    echo - script: dotnet test>>%AZUREPIPELINE%
    echo   displayName: 'Test library'>>%AZUREPIPELINE%
    echo.>>%AZUREPIPELINE%
    echo - script: dotnet publish -c $(BuildConfiguration)>>%AZUREPIPELINE%
    echo   displayName: 'Publish library'>>%AZUREPIPELINE%
    echo.>>%AZUREPIPELINE%
    echo - script: dotnet pack -c $(buildConfiguration) -p:PackageVersion=$(Major).$(Minor).$(Patch)>>%AZUREPIPELINE%
    echo   displayName: 'Pack library'>>%AZUREPIPELINE%
    echo.>>%AZUREPIPELINE%
    echo - script: dotnet nuget push --source "%RepoAlias%" --api-key az .\%LibraryName%\bin\$(buildConfiguration)\*.nupkg --skip-duplicate>>%AZUREPIPELINE%
    echo   displayName: 'Push library'>>%AZUREPIPELINE%
    
    set TASKSJSON=%SolutionName%\%LibraryName%\.vscode\tasks.json
    mkdir %SolutionName%\%LibraryName%\.vscode
    
    echo {>>%TASKSJSON%
    echo     "version": "2.0.0",>>%TASKSJSON%
    echo     "tasks": [>>%TASKSJSON%
    echo         {>>%TASKSJSON%
    echo             "label": "build",>>%TASKSJSON%
    echo             "command": "dotnet",>>%TASKSJSON%
    echo             "type": "process",>>%TASKSJSON%
    echo             "args": [>>%TASKSJSON%
    echo                 "build",>>%TASKSJSON%
    echo                 "${workspaceFolder}/%LibraryName%/%LibraryName%.csproj",>>%TASKSJSON%
    echo                 "/property:GenerateFullPaths=true",>>%TASKSJSON%
    echo                 "/consoleloggerparameters:NoSummary">>%TASKSJSON%
    echo             ],>>%TASKSJSON%
    echo             "problemMatcher": "$msCompile">>%TASKSJSON%
    echo         }>>%TASKSJSON%
    echo     ]>>%TASKSJSON%
    echo }>>%TASKSJSON%

    In the folder containing the solution (*.sln file) the following commands can be executed and produce the corresponding output.

    dotnet build
    dotnet test
    dotnet publish
    dotnet pack

    I recommend working with Visual Studio Code. Support for .NET is great and it is highly configurable. The library project contains a folder “.vscode” with a “tasks.json” file. This file contains a single build definition. The definition object in the array “tasks” can be copied and modified to support different task types like “test”, “publish” and “pack” directly from Visual Studio Code. They can be run by pressing [Crtl]+[Shift]+[P] and selecting the following:

    A defined task can the be selected and is executed in the terminal:

    I hope this script helps to create projects. Writing the correct pipeline definitions and configs took me some time to learn. Now the projects are easily created.

  • AllInOne DevOps solution

    “Learning” for me means “practicing”. That’s why I started initializing every single small project with a Git repository, setting up a simple build pipeline and exporting artifacts to a central repository and I do this for Java projects (Gradle, Maven) in the same manner as for .NET projects (dotnet, NuGet). One might ask now: Why not just build the project and copy the output? This method is usable when it is only one project worked on by one developer for example when someone wants to try out some stuff, wants to learn project specifics or it is just a small thing to code (well, even then it is better to setup the tools because if the project grows you have everything ready for a big team). But as soon as there are more developers working on a project it is necessary to use collaboration and automation tools. That’s why I practice setting up the build environments with every new project because then it is routine and not a burden to do.

    What is the goal of this article? Let me start with the non-goal: I don’t want to provide a “Click here, then there, then fill this field and click Install.” tutorial. I want to share my experience, provide links to the tools I use and what to do with them and show the outcome. Most of the knowledge needed for this is generic: Setting up a SQL server is not specific to the usage in Azure DevOps and neither is setting up Windows 10. There are a lot of tutorials out there and I don’t have to reinvent the wheel here. I want to show that setting up these tools in the shown order leads to a running DevOps server that can save a lot of time and improve code quality and team collaboration.

    So, what is this setup for? Copying output manually can, as mentioned, be done for one project, maybe two and maybe also up to 10. But then this becomes annoying, confusing and hard to manage. As soon as I work on many projects I just want to commit and push my stuff and the rest is done by the build environment. And that is what this setup is about. Let’s start with the preconditions and prerequisites. I really use a power machine for this task:

    • HP Compaq 8200 Elite (initially bought 2012)
    • Intel Core i5-2500 quad core CPU (Yes, “Sandy Bridge” generation)
    • 16 GB DDR3 memory
    • 500GB Crucial SATA-SSD

    So, as you can see, you really need top of the line, high performance hardware 😉 No not really. What I want to show here is, that a small, old office computer does the job for learning the stuff.

    On the software side I use the bundled operating system and some other tools and programs. Don’t worry, they are all free of charge:

    These are all the things you need. Really.

    What are the limitations? First of all: You can’t use these tools for big business work loads and environments because they have hardware and software limitations. It’s more than enough to learn, practice and implement small projects but as soon as the requirements rise these limitations prevent you from using the tools in a large environment. The good thing is that the learned skills can be applied directly to big environments because the tools are the same and are handled the same way.

    The setup is divided into a few steps to make it easier. I start with a blank machine: No OS, no software and an empty drive:

    1. Install Windows 10 Pro. You can get it from here. It should already be activated if it was installed beforehand on the computer and the computer is connected to the internet.
    2. Download and install SQL Server 2019 Express.
      It is required for Azure DevOps and can also be used for development databases. I recommend a local setup with “sa” user.
    3. Download and install the latest Azure DevOps setup. I recommend also a local installation with http only. Setting up a SSL PKI and configuring IIS would be to much and does not serve the purpose here.
    4. Download and install Oracle VirtualBox and the extension pack.
    5. Setup one or many build agents (Windows agents can be directly set up on the machine, Linux agents can run in VirtualBox instances). Builds are only running on agents, not the DevOps server itself.

    As soon as these five steps are done the build server can be used for different project types. Just to name a few:

    • Java projects
      • Can be build on Windows and Linux build agent.
      • Supports different frameworks (JavaEE, Spring, Vaadin, …)
      • Supports build systems like Gradle, Maven and Ant.
    • .NET core
      • Builds all kinds of projects as long as the tools are installed on the build agents.
      • Has native support for .NET core tasks.
      • Easy usage of private NuGet repository.
    • Plain tasks with scripts
      • Supports different script languages like PowerShell and Bash.
      • Deployment with ssh.
    • JavaScript
      • Supports common JavaScript frameworks.

    I don’t want to go too much into detail here because there are tons of tutorials on the internet and the setup itself is pretty much self explanatory and supports the user with assistants.

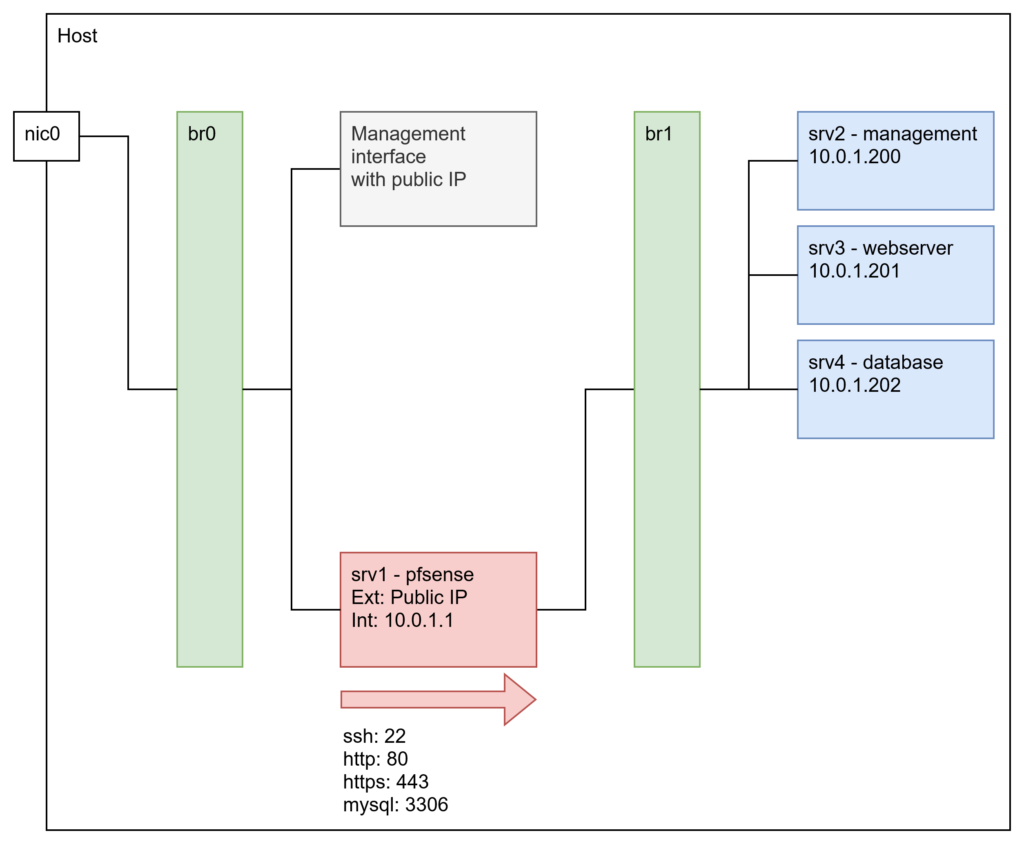
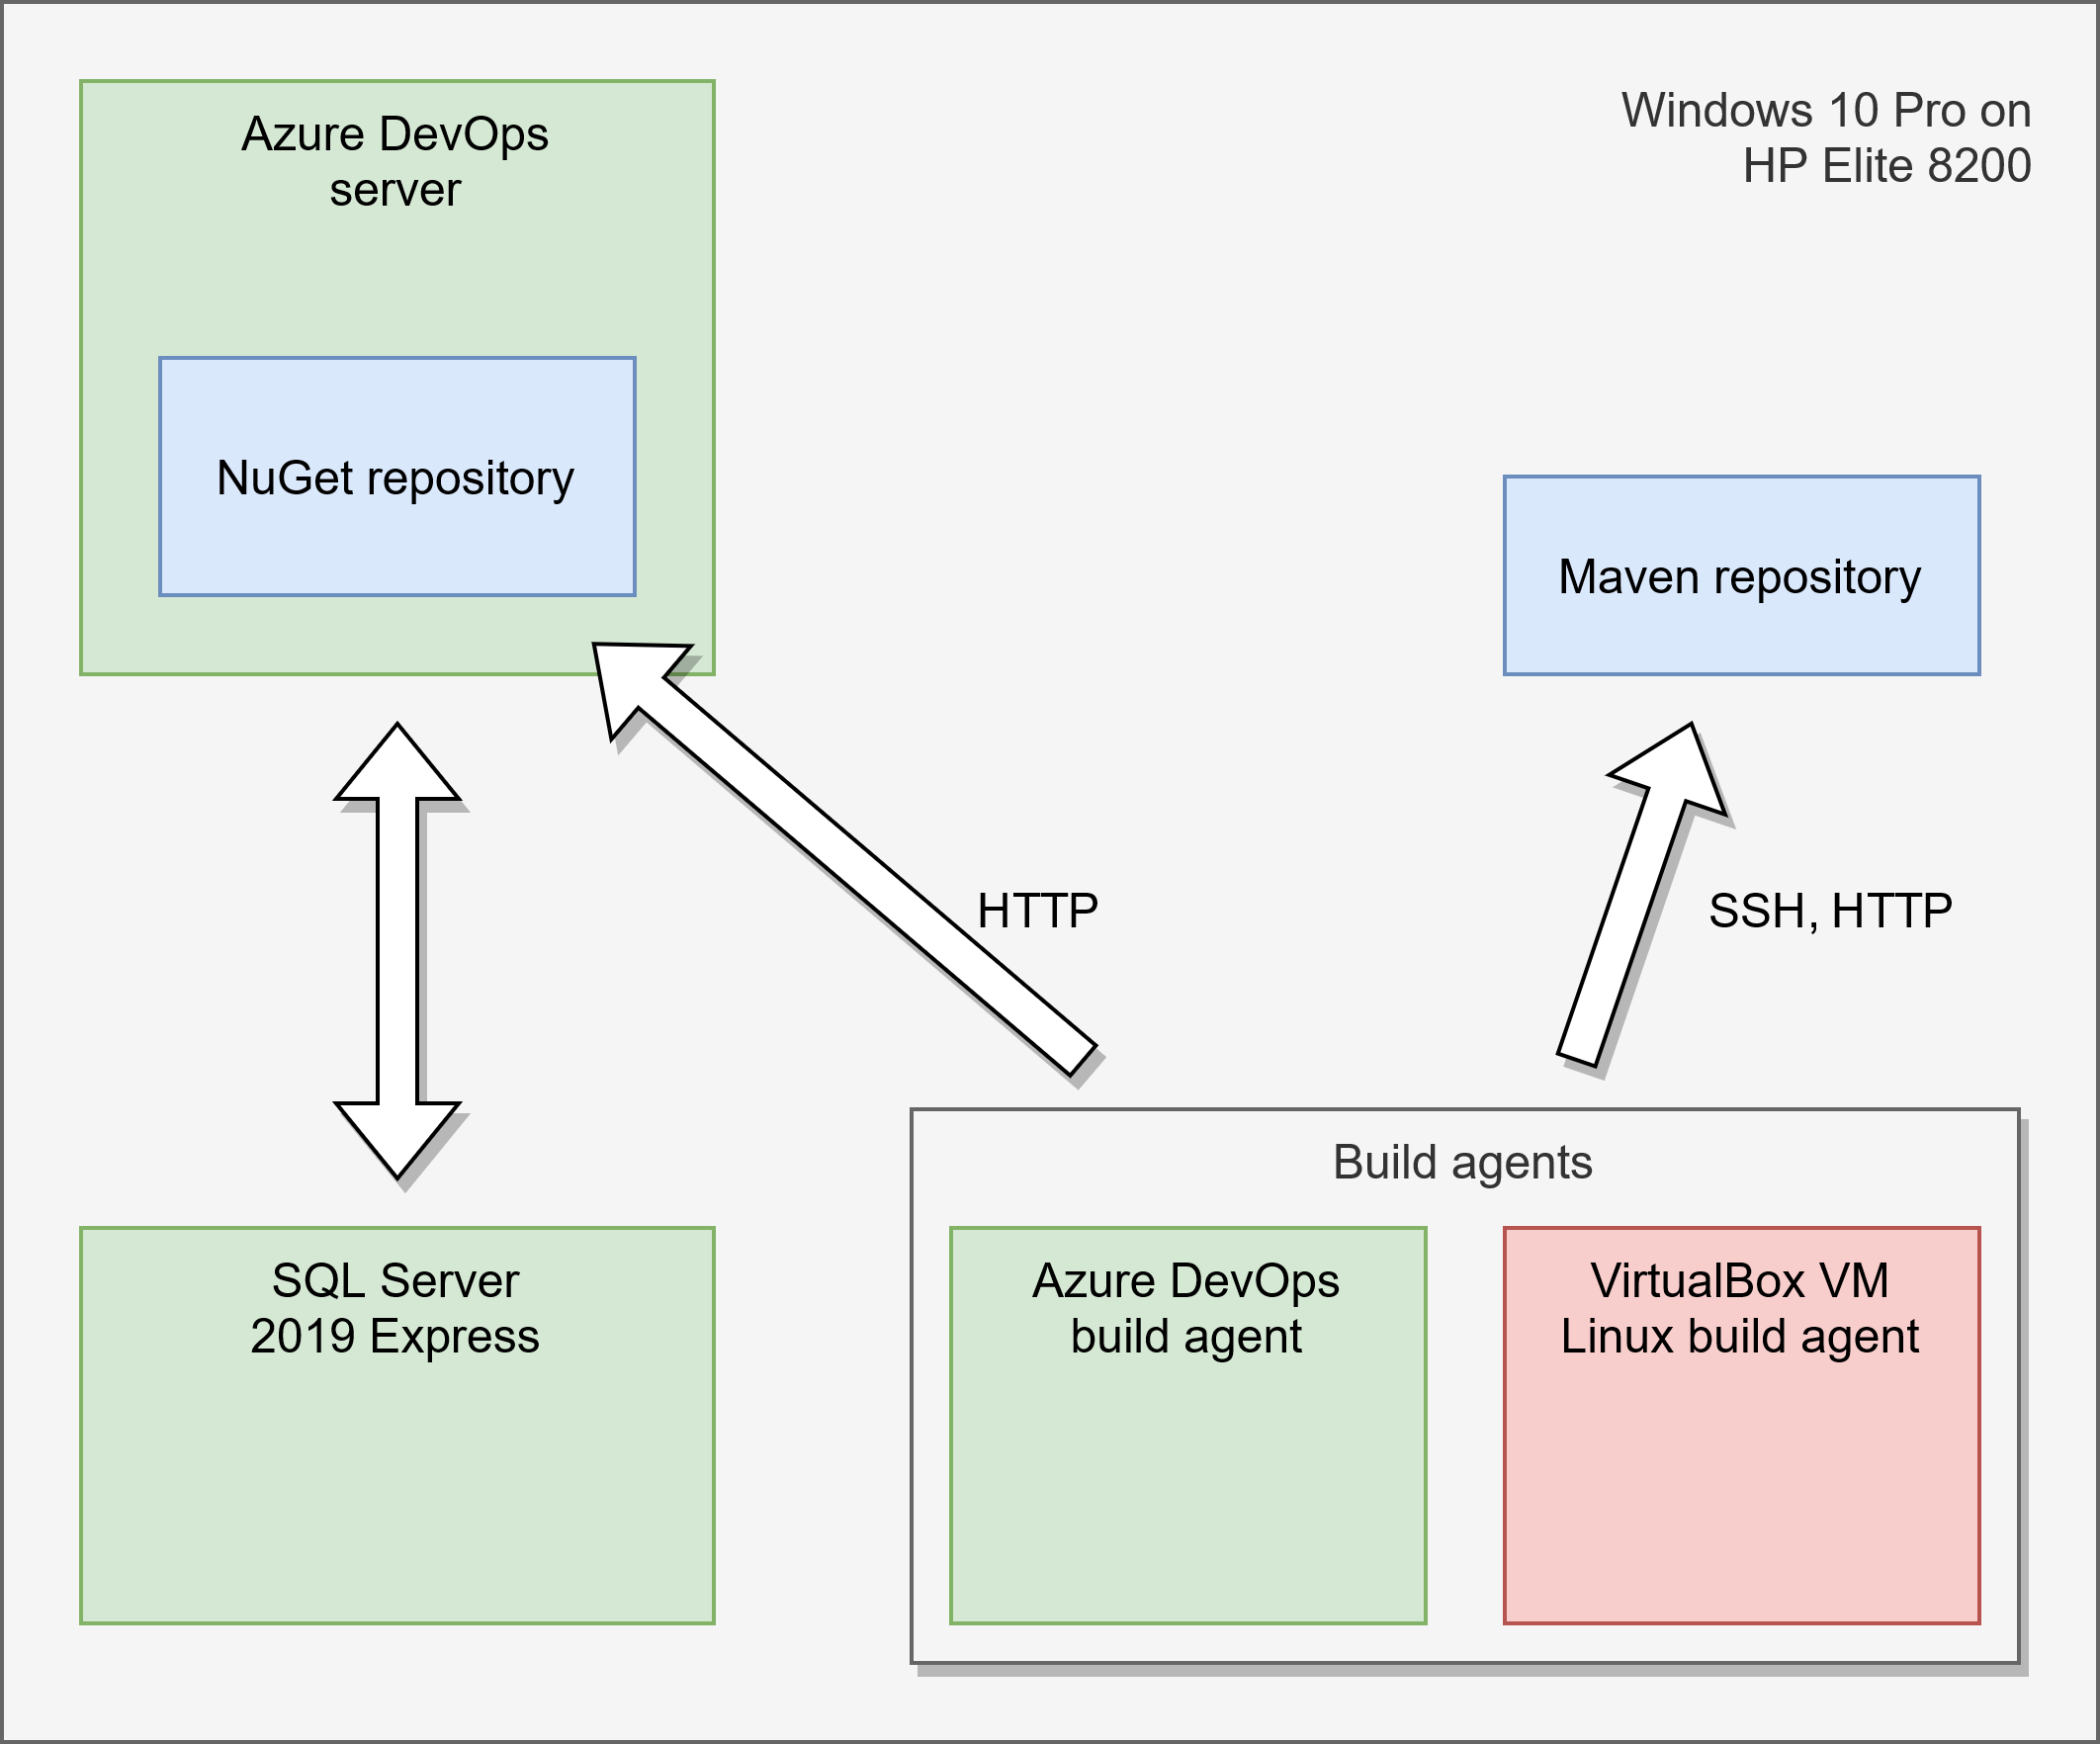
    The following diagram shows the architecture. The only difference to my setup is, that my Maven repository is externalized and is not running on the DevOps server. It is optional anyway and used for Java library distribution. So if one is not building Java projects it is not required.