Blog

  • Redirecting with mod_rewrite

    Assume you have a shiny new site with great content, a new URL (or http address) and are expecting customers. Unfortunately your old site is not yet really gone in the search results but luckily you still have access to your old address. There is an easy way to redirect the users, who click on the search results pointing to the old page.

    1. Setup a vhost

    You need to answer to those requests. For this step it is assumed that the old domain is pointing to a web space or server managed by you. Basically all you need is a folder and a configured host (vhost):

    <VirtualHost *:80>
      ServerName my.old.domain
      DocumentRoot /var/www/myoldsite
      <Directory /var/www/myoldsite/>
        Options Indexes FollowSymLinks MultiViews
        AllowOverride All
        Require all granted
      </Directory>
    </VirtualHost>
    <VirtualHost *:443>
      ServerName my.old.domain
      DocumentRoot /var/www/myoldsite
      <Directory /var/www/myoldsite/>
        Options Indexes FollowSymLinks MultiViews
        AllowOverride All
        Require all granted
      </Directory>
      SSLEngine on
      # SSL configuration
    </VirtualHost>

    Let’s just answer on both ports. Just in case. And don’t forget to enable mod_rewrite:

    a2enmod rewrite

    Now if the page is opened, there is no error but a empty directory listing. Better than nothing, but the goal is to redirect to the new page.

    Hint: I am realizing this with a “.htaccess” file because this way I can reconfigure “on the fly” and do not have to reload the web server after every change.

    2. Setup “.htaccess” for redirection

    Create a new file in the directory ” /var/www/myoldsite” named “.htaccess”. Don’t forget the leading “.”!

    RewriteEngine on
    RewriteCond %{QUERY_STRING} ^(.*)$
    RewriteRule .* https://my.new.site

    This means: If the url contains a query string (the part after the top level domain) rewrite the whole URL to ” https://my.new.site”.

    Why?

    You don’t know which sub pages are cached and shown in the search results. So: It’s better to just forward all to the new page instead of showing a “404 – not found”. Plus: You can define multiple rules and forward specific matches to possible new sub pages. But that would be beyond the scope of this short tutorial.

    Why just sub pages?

    On the main page I show a hint, that the URL has changed and that the user should be so kind as to change his bookmarks if the old URL is stored there. He is automatically redirected to the new page after 7 seconds:

    <!DOCTYPE html>
    <html>
      <head>
        <meta http-equiv="refresh" content="7; url='https://my.new.site'" />
        <style type="text/css">
            * { font-family: sans-serif; }
        </style>
      </head>
      <body>
        <p>The domain has changed to 'https://my.new.site'. If you have bookmarks, please save them under the new domain. You will be forwarded in a few seconds. Alternatively you can use <a href="https://my.new.site">this link</a>.</p>
      </body>
    </html>

    I hope this helps somebody to guide users and customers to a new and improved web presence without having to deal with ugly error messages and confusion when clicking on search results.

  • Why DevOps?

    Why not just developers, like Steve Balmer once said? Why not just managers? Why do you need someone who understands how software is written and who also understands how it can be tested, packaged, deployed and maintained in an automated manner? I think this question answers itself, doesn’t it?

    I’d like to bring up an example that I have experienced first hand: Deployment of a PHP based software, developed by an external developer and originally published over a deployment tool provided by the framework developers.

    The situation was, that the developers had access to the deployed instances of the software and applied patches manually. This led to the situation that no one knew which patch level was installed on which machine. To be honest it wasn’t even possible to talk about patch levels because hot fixes were applied directly and sometimes not integrated into other installations or the distribution itself. So how do you maintain this? That’s the neat part: You don’t!

    So what can you do about this?

    1. Draw a line

    The development was separated from the deployment and the interface was a versioned zip distribution of the software in the developer to customer direction. Customer to developer direction was implemented as bug tickets and development sprints with a versioned outcome.

    2. Split up, define and clean up

    All parties, developers, administrators and the DevOps Engineer in between, use the same environments and use the same point of origin: A clean machine with a defined operating system and a clear and not deviating setup procedure. Required manual changes are reported back to the DevOps engineer in order to integrate them into the machine setup process and every one in the team knows how the machines are set up and how they are supposed to work. Log files are in the same location, the same technologies are used on all machines and there are no manual fixes on production instances.

    3. Automate

    As soon as things are clear: automate. Set up pipelines (in GitLab, Azure DevOps or Jenkins for example), define access (API, SSH or other remote protocols) and specify the installation procedure. This means where to gather your software, what to install, how to configure installed tools and what external sources, like DNS entries and certificates, to use.

    Conclusion

    The basic tasks of DevOps, like compiling (gcc, javac, csc, tsc …), packaging (Nsis, zip, tar, …), deploying (FTP, SSH, SMB, …), patching and archiving (Maven, NuGet, npm, …) are similar if not the same in most of the cases. One has to know the protocols, how they act together and what it means to “setup” software. A software product is a conglomerate of multiple components: Application, configuration, environment, database and many more things. As a DevOps engineer you have to know that these things exist, that they can be set up and you need the drive to dig into the configuration and not just be satisfied with “yeah it works now”. What drives me is the “How does it work?”, “How is it done in best practice?” and “How can I automate it reproducible?” Yeah, maybe sometimes I invest a little too much time into digging into the topic but I think after 100.000 iteration where my script, I spent a few hours on, works I think it has paid off …

  • Improve Gimp UI integration

    Okay, this is nothing functional and really just something for the eye. I am using Gimp on a regular basis and think it is a really great piece of software. There was just something that annoyed me every time I used the software: The font integration which looked to me somehow “out of place”. Let me give an example:

    The font here just does not match the default Windows font “Segoe UI” and the scaling is also different. This is how it should look like:

    You can clearly see the difference in the font presentation. Good thing is, this can easily be changed in the file “gtkrc” in the theme directory:

    %ProgramFiles%\Gimp\share\gimp\2.0\themes\Dark\gtkrc

    Replace “Dark” with the theme you are using on your system. There are a few of them in this folder.

    1. Uncomment the line starting with “#gtk-font-name” and change it to:
      gtk-font-name = "Segoe UI 9"
    2. Find the line
      GimpRuler::font-scale = 0.6444
      and change it to
      GimpRuler::font-scale = 1
    3. Find the line
      GimpDock::font-scale = 0.6444
      and change it to
      GimpDock::font-scale = 1

    With these changes Gimp should look like a regular Windows application using the default font.

  • GitLab: Persisting data between jobs

    When I first tried to write and run pipelines in GitLab first thing I got were errors. I tried to create a json file containing data that needed to be accessible in each job of the pipeline. This was an id generated randomly in the first step and each following step would rely on this id to produce additional data and store it. I found out, that my generated id file was not accessible in the follow up steps and thus my pipeline would not work. Fortunately there is a solution for this and I’d like to share in a simple example of three files how to make this work. This can be adopted to all sorts of data like binary files, test results, compiler outputs, generated PDFs and all sorts pipeline output. This documented in detail on the official GitLab documentation page but because I prefer quick and direct tutorials handling just my core problem and leave modifications and extensions to me instead of blown up documentations covering every single detail I want to share my solution here.

    My solution consists of three files. The first two are the two scripts for the steps. Step one generates the JSON file and stores it and is called “step1.ps1”:

    $MyObject = @{
    	guid = (New-Guid).ToString()
    }
    $Json = ConvertTo-Json -InputObject $MyObject
    Set-Content -Path "guid.json" -Value $Json
    Write-Host -Object "Generated Guid: $($MyObject.guid)"

    The second file is called “step2.json” and reads the generated id from the JSON file and thus needs access to the file “guid.json”:

    $Json = ConvertFrom-Json -InputObject (Get-Content -Raw -Path "guid.json")
    Write-Host -Object "Loaded Guid is $($Json.guid)"

    Why is the generated UUID printed to stdout via “Write-Host”? To check if they are the same in the pipeline.

    Finally the “.gitlab-ci.yml” file defines the pipeline:

    stages:
      - create
      - read
    
    create-json:
      stage: create
      script:
        - pwsh -File step1.ps1
      artifacts:
        paths:
          - guid.json
    
    read-json:
      stage: read
      script:
        - pwsh -File step2.ps1

    So now your folder should consist of three files containing the shown code:

    And running the pipeline in GitLab will show this:

    The jobs can then be opened and should show …

    $ pwsh -File step1.ps1
    Generated Guid: deb4e6cc-c968-4c86-95f5-fd72ca0f64c9

    … in the “create-json” job and …

    $ pwsh -File step2.ps1
    Loaded Guid is deb4e6cc-c968-4c86-95f5-fd72ca0f64c9

    … in the “read-json” job in the log output.

    Now one has the basic principle implemented to share data and artifacts between jobs.

    But wait … there’s more!

    When opening the job the generated artifacts can be downloaded to the local disk:

    This zip file would now contain the file “guid.json” generated by “step1.ps1” and defined in the file “.gitlab-ci.yml” with the lines

    artifacts:
      paths:
        - guid.json

  • Eclipse bundle creator

    For development of Spring Boot applications, designing Jasper reports, writing regular Java applications and libraries build with Gradle, development of database scripts and DB management in general with DBeaver and development of C/C++ applications I use Eclipse with a few plugins. Now eclipse releases a new version every three month and I was always annoyed by the time consuming process of downloading and creating a new distribution that would fit my needs. Fortunately Eclipse offers a command to automate this process on the command line.

    The theoretical part

    For this script to work Java has to installed and available in the global path.

    This chapter shows the command line options:

    -application org.eclipse.equinox.p2.director

    This parameter takes two more arguments.

        -repository $RepoListStr
        -installIU $FeatureListStr

    $RepoListStr is a list of repository urls separated by “,”.

    $FeatureListStr is a list of features to install separated by “,”.

    $FeatureList = "org.eclipse.epp.mpc.feature.group,org.eclipse.buildship.feature.group,..."
    $Repos = "https://download.eclipse.org/releases/2021-12,https://download.eclipse.org/eclipse/updates/4.22,..."

    In the end the full command looks like this:

    eclipse.exe -application org.eclipse.equinox.p2.director -repository $RepoListStr -installIU $FeatureListStr

    The script

    I have published the full installer in my GitHub repository. The script can be altered and features can be added and removed if needed. I tried to document the features I need the most.

    Feature IDs

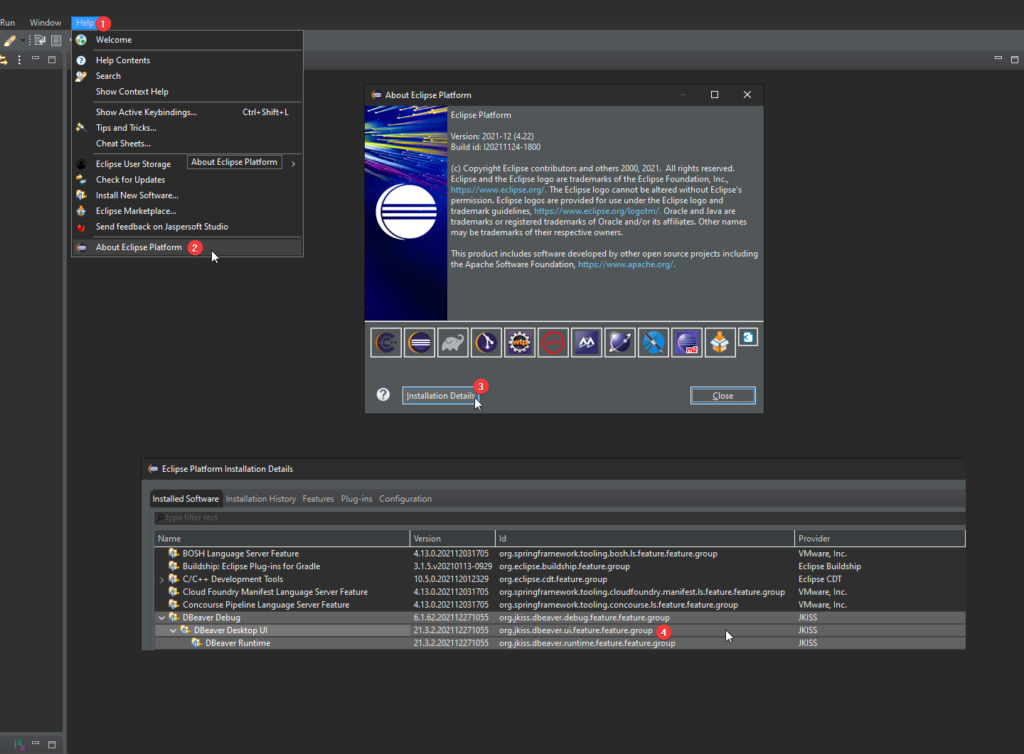
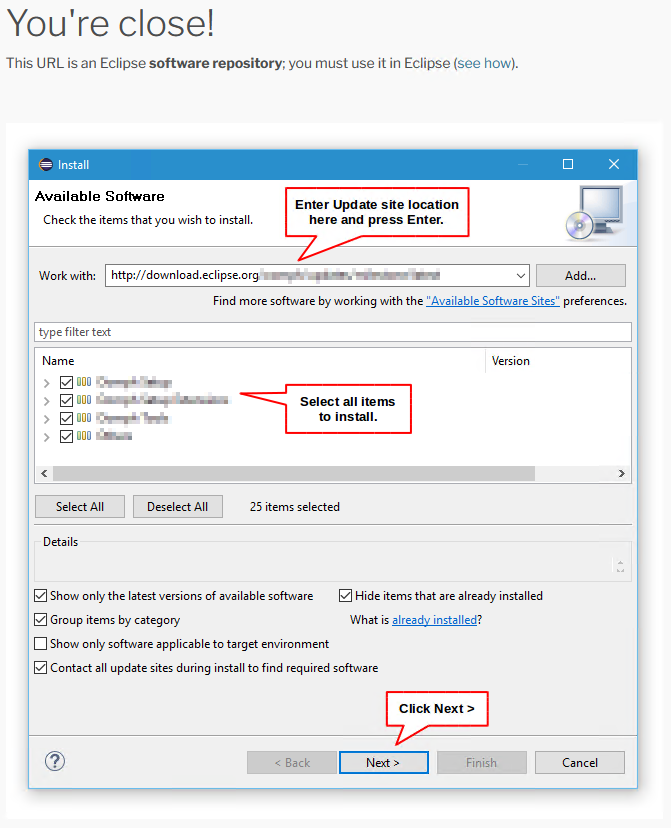
    Now how do you get the feature ids for your desired components? The easiest way is on a already installed environment following this path:

    Repositories

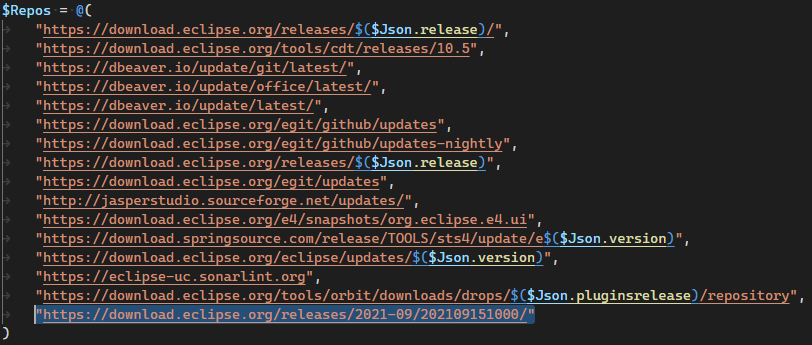
    And how do you get the corresponding repositories for the repository array? Again on a already installed system:

    Additional configuration

    The script also alters the memory configuration to a initial size of 1GB and a maximum consumption of 4GB in “eclipse.ini”. Without this I ran in a “OutOfMemory” exception a few times. Further more automatic updates are enabled. This should be removed if the IDE is installed under “%ProgramFiles%” and UAC is enabled.

    Troubleshooting

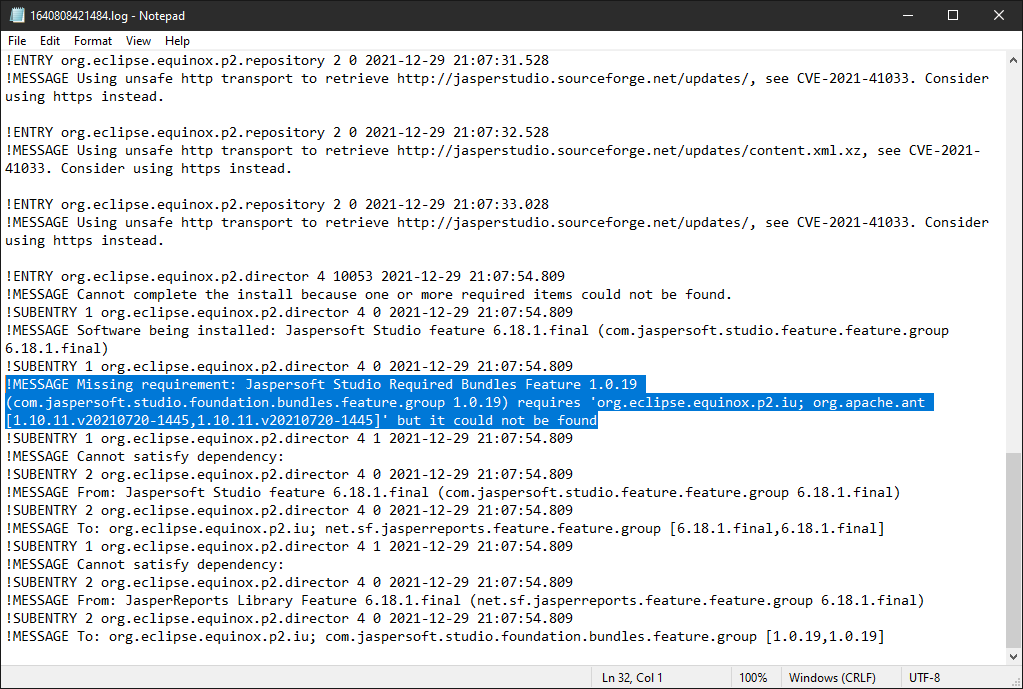
    Sometimes a repository is missing or something goes wrong. Then features are missing. This can be detected in a certain log file. In the temporary directory Eclipse is extracted in and which is opened when the script has finished there is a folder “configuration” that contains files in the form of “<timestamp>.log”. For example: 1640808421484.log

    This file then shows a message like the following:

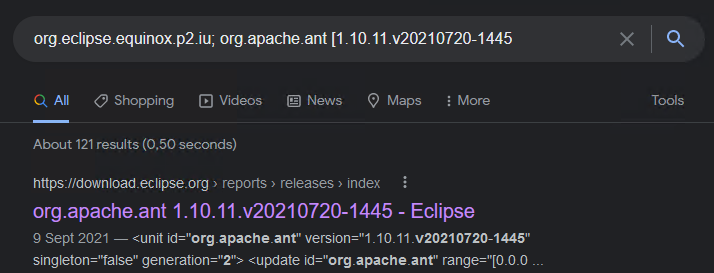
    This means that a certain dependency could not be found. I’ll show one way to fix this. Search for the problem causing library:

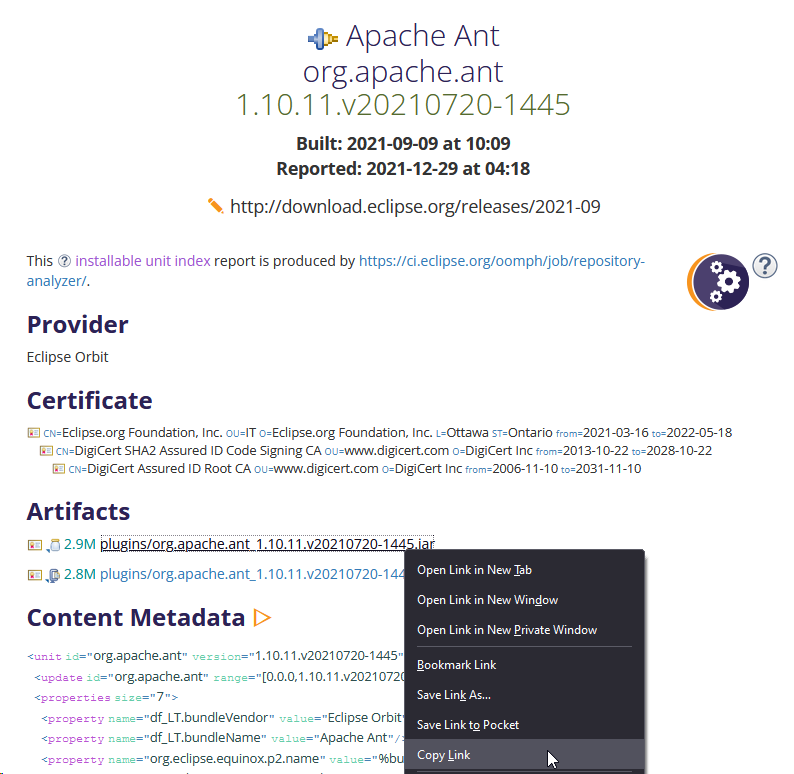
    Open the hit that leads to the eclipse page and copy the link:

    Paste the copied link into the address bar and remove the highlighted part:

    Open the page:

    This is the eclipse update page. Copy the URL and add it the “Repos” array:

    Rerun the script. Now the library should be found. This can be repeated if more errors occur.

  • Setup Msys2 automatically

    Some time ago I wrote a short post on “How to develop a 64bit C application on Windows 10 with Visual Studio Code“.

    To be honest´it is a little bit tricky setting up the development environment, with gcc, gdb, make and other required tools. So I have extended my automated installation script.

    This script will:

    • Install Msys2 in “%LocalAppData%\Programs\Msys2” (Under your user directory. Thus, no admin privileges are required.
    • Install all the required tools for development like compiler, linker, debugger, etc.
    • Update everything to the latest version.

    If you download the file from the repository it is possible that PowerShell will ask you if you really want to run the file. You can prevent this from happening with the following command:

    Unblock-File -Path install.ps1
    Are you sure you want to perform this action?
    Performing the operation "Unblock-File" on target "C:\Users\Path\to\download\directory\install.ps1".
    [Y] Yes  [A] Yes to All  [N] No  [L] No to All  [S] Suspend  [?] Help (default is "Y"):

    There will be a console windows flashing up a few times. When everything is done the regular prompt of PowerShell is shown.

  • Run Linux services only as local user

    Some time ago I wanted to let services like Apache, application servers, databases and stuff run as “Active Directory” users under Linux. Linux uses a component called “winbind”, which is part of the all famous “Samba” package, to connect to an “Active Directory”. What it does is basically map your AD (short for “Active Directory”) users to local users. One can log in, have a home directory, permissions, the users can become root by using the command “sudo” and so on. So why not use it for services?

    Well, as mentioned “winbind” maps the users and to let a service run under a specific user the user has to be accessible (or better: the user must exist). AD users do not exist as long as “winbind” is not loaded and when a service tries to start as long as “winbind” is not loaded it will terminate in an error. This is also relevant when using AD users for virtual hosts in Apache. There is a way to let certain virtual hosts run as a specific user instead of “www-data”. Same goes for cron: When the cron service starts and should run a certain command at a certain time in space as AD user but “winbind” is not loaded it will throw an error even tough winbind would be running when the command is scheduled to be executed. If “cron” does not know the user when parsing the file “crontab” it will not execute the command. These are a few findings why it is a bad idea launching services as AD users.

    My solution approach was to find something in “SystemD” like “winbind.target” and define my required services to only run if “winbind” is already loaded, but unfortunately there is no such thing. If anyone has an idea how to solve this feel free to contact me. Would be much appreciated.

    The solution I came up for me now is to execute “SystemD” services as local service user that can not log in. If the service creates data it is stored in the local service users home directory. To manage and access this production data “winbind” can be utilized: Share the service users home directory via a directive in “smb.conf”:

    [svcshare]
        comment = Service user directory
        browsable = yes
        writeable = yes
        path = /home/serviceuser
        valid users = @LinuxAdmins
        force user = serviceuser
        force group = serviceuser
        create mode = 0644
        directory mode = 0755

    This block allows members of the AD group “LinuxAdmins” to access the local service users home directory and upload and modify data. But data uploaded by this users is assigned “serviceuser” as username and group. This means the service an run even tough AD may not be accessible (server changed network, network error, etc.).

    I have now several services running stable with this solution and it works like a charm for me.

  • Change date modified of files and delete files other than n days

    I am working on a backup script on Linux and for that I need test data: Files that are modified on certain dates and that I can scan for. Of course I could create a file every day for the next month, but that would take a little too long. I found out, that one can use the command “touch” to change the dates for “modified” and “last access”

    touch -m -t 202107200100.00 test.txt

    This would change the modified date of the file “test.txt” to the 20th of July 20201 01:00:00 at night. This could be integrated in a loop for example. To create 10 files with one modified each day the following script does the job:

    #!/bin/bash
    i=20
    while [ $i -ge 10 ]
    do
      touch test_$i.txt
      echo "Hello World" > test_$i.txt
      touch -m -t 202107${i}0100.00 test_$i.txt
      ((i--))
    done

    Of course, this is pretty simple, but it does the job for my task.

    To scan and delete files older than 5 days I can then use …

    find . -mtime +5 -delete

    … in the same folder.

    Pretty neat, huh?

  • Securing your private keys and preventing others from using them

    I have to access a lot of server remotely and for this I am using public/private key authentication. This means basically that I have a key pair, consisting of public and private key, on my computers that identifies me. If I need access to a remote machine I send my public key to the administrator or configure it on the remote machine myself if it is managed my me. This means if someone would get access to my key, for example by accessing my computer with a Live-Linux, this person could access the servers I have access to.

    Because of that I see it as my responsibility to take precautions to keep my keys secure and prevent others to access them, even if they have access to my computer (for example if my computer is at the repair shop or unguided in the office).

    To achieve this task I take two possible ways into consideration:

    1. Password on your private key file.
    2. Disk encryption.

    Password

    If the private key is protected with a password it is basically useless without it. It can not be used to access the servers because the connection is blocked. This is basically using your own password to connect to a remote servers without telling it to the administrators. This method has one drawback:

    • The password has to be entered every time when connecting or at least when starting an agent software that provides the keys during a session.

    Disc encryption

    Disk encryption is the second method to prevent someone from getting your keys by accessing the disk directly from a third party operating system. It is supported by major operating systems and also secures other data on the hard drive. But there are also drawbacks:

    • A pin code has to be entered when starting the system.
    • Performance is worse because data has to be decrypted during runtime.
    • When the pin is forgotten the data is basically lost.
    • The pin offers less security than a complex password on the private key.

    Conclusion

    Both methods help to prevent fraudulent access to the private key of a user. From my point of view the password offers more convenience and security and does not come with the risk of completely losing data in case the pin is lost. If the password is forgotten a copy of the key could be stored on a USB drive or CD in safe as a backup. Even a print out could be stored and typed back in.

    I will go with the password secured key from now on and will store a copy at home. On machines, that are accessible by others I will use the password protected key. On machines with no public access, for example at home, I will use the password less version of the key.

  • Get full path of executable in PATH variable

    Ever wanted to get the full path of an executable that is located in the global PATH variable? Maybe for configuration purposes? Take a look at the following snippet. It may help you:

    (Get-Command -Name @("code.cmd")).Path | ForEach-Object {
    	Write-Host "$(([System.IO.DirectoryInfo]$_).Parent.FullName)"
    }

    This will show the full path of the parent folder containing “code.cmd”. The term “code.cmd” could be replaced with “java”, “cmd”, “powershell” or whatever is configured in the global path. It could be useful to find out what version of a certain framework or program is used for example.